Friday, March 29, 2013

Dye-I-Y with Jacquard Products: Which Dye Goes On Which Fiber?

Today we continue our Dye-I-Y Series with a two part introduction to the most commonly used fibers and dyes. First we discuss how to categorize the fiber that you are dyeing. Then we introduce our four most commonly used dyes while addressing our most frequently asked question about dyes; which dye is best for which fiber? This series is intended for first time and beginning dyers. Experienced dyers, we invite you to add your input in the comments section below!

There are three main things to consider when selecting the dye you are going to use:

1. Which type of fiber are you dying? 

For our purposes, we divide our fabrics into 5 different categories:

Cellulose Fibers are plant based fibers, such as cotton, linen or rayon.
Protein Fibers are animal based fibers such as silk or wool.
Natural Fibers are any natural fiber, whether cellulose fibers or protein fibers.
Synthetic Fibers man made fibers such as polyester or nylon.
Blended Fibers are a mixture of any of the above fibers.
 
2. What dye method works best for with the time and resources you have available? 

In situations where more than one dye is appropriate for the fiber you are working with, often times the next deciding factor for someone who is new to dyeing will be which method will work best with your available resources.

For example, if you are choosing between the stovetop method and washing machine method and you don't have a large pot on hand, you might opt for the washing machine method. Conversely, if you didn't have access to a washing machine, you might elect to do the stovetop method. Depending on the fiber you are dyeing you may not have a choice. For example dyes that require a great deal of heat to fix (such as iDye Poly) will require a stovetop method.

3. How important is permanence and longevity?

Last but not least, quality is a very important factor for every dyer.Your selection may sometimes come down to a decision between quality and convenience. For example, if you are dyeing cotton, you have a choice between the convenience of iDye which comes in a pre-measured packet, and the vibrancy of Procion MX Dye, which must be measured out, and used with soda ash. The Procion MX dye will offer more permanence, but will take additional steps to complete. 

Here is an introduction to our four most commonly used dyes: 

Please note, this is meant as a general overview. Different methods may have different materials requirements, so please be sure to read the full instructions before you proceed.


Most people choose Procion MX dye for cellulose fibers because it offers the most vibrant colors and has the best permanence. This dye that fixes without the use of heat, which makes it one of the easiest dyes to use. Procion MX dye is fixed with Soda Ash, whether you pre-soak your garments in soda ash before applying dye, or you mix it directly in to your dye bath. See full instructions for more details. Procion MX dye is also one of our most versatile dyes, with countless methods. It's best known use is for Tie Dye. The Procion MX dyes are what we use in our Tie Dye Kits.

Use it on: Cellulose fibers, such as cotton, linen, hemp, or rayon.
Methods: Tie dye, immersion dyeing, washing machine method to name a few. See the full instructions for additional suggestions. 
Additional Materials You May Need: Soda ash, non-iodized salt, synthrapol, dyeset concentrate, iDye fixative.
Other Uses: Silk screening, batiking,  can also be used on protein fibers and even wood.
Full Instructions: Procion MX Instructions   

iDye is our easiest to use dye. It comes in pre-measured dissolvable packets, and doesn't require a Soda Ash fixer, making it extremely user friendly. As an added convenience, many of our iDye Natural colors can be used with the washing machine method. For darker or more vibrant colors, we do recommend using the stovetop method. See the link below for full instructions. For increased permanence, we recommend using the iDye Fixative.

Use it on: Any natural fiber, including cellulose and/or protein fibers.
Methods: Stove top or washing machine method.
Additional Materials You May Need: Non-iodized salt, white vinegar
Full Instructions: iDye Natural Instructions


iDye Poly is the only dye we offer for synthetic fibers, which are very difficult to dye. iDye Poly requires a very high temperature to achieve good color so the stovetop method is essential for success. It works on polyester and nylon fabrics, but it is also used for dyeing solid items such as RC car parts, frisbee discs, and items printed with 3D printers. 

Use it on: Polyester, nylon. (will not work on acrylic)
Methods: Stove top method only.
Additional Materials You May Need: None. Can be blended with iDye Natural for blended fabrics.
Full Instructions: iDye Poly Instructions


Acid dyes are meant for protein fibers, and are best used with the stovetop method. Acid dyeing can be particularly satisfying. If you get your dye to fabric ratio just right, all of the dye will be absorbed in to your fabric, leaving you with a clear dye bath!

Use it on: Protein fibers such as silk or wool. 
Methods: Stove top, washing machine, flowable paint, and  silk screening methods.
Additional Materials You May Need: White vinegar, synthrapol.
Full Instructions: Acid Dye Instructions

Next up, we'll begin a series of tutorials for each of our dyes, starting with iDye Natural! Got questions? Leave them in the comments below!

For more information, consider reading our posting in our dye forums. 
Another excellent resource is professional dyer Paula Burch. We recommend starting with her FAQ section.

Wednesday, March 20, 2013

Dye-I-Y with Jacquard Products: Top Three Things To Remember About Dyes

Spring is here and that means dyeing season has officially begun!  Today we are kicking off a series of dye tutorials we are calling Dye-I-Y. Once we cover the basics about dye, we'll explore some of the more popular dyeing techniques. Many of our customers are seasoned professionals, so these posts will be oriented more for our beginners and first time dyers. We invite any experienced dyers to add their own tips and tricks in the comments below!

Before we dive in to this series, please note that all of the instructions can be found on our website, under the corresponding product heading. Materials Safety Data Sheets, or MSDS Sheets, are available under the support tab on our website, located here. Now, without further ado, here are the Top Three Things To Remember About Dye:

1. Dye is transparent.

It helps to think of the dye as a colored lens or filter which you apply over the existing color. This means if you are not starting with a white or very light fabric, you will need to take the base color into account when you apply your dye. It's impossible to predict the exact hue you will achieve without perfoming a controlled test, but generally one would expect that yellow dye on a blue fabric would yield green, whereas yellow dye on a black fabric would likely not show up at all. Following this logic, you'll soon realize that there is no such thing as white dye. Some dyers like to joke that there is white dye - it's called "water."

2. Dye goes on all fibers differently.

The only way to know for sure is to test it. There are many variables that can affect your outcome, some of which are impossible to predict. The method used, time in the dye bath, temperature of the bath, and the amount of room in the dye bath are just some of the factors that can affect the dye job. The fiber itself can also affect the end result. Sometimes there is a treatment on the fiber that isn't apparent from the garment tag, for example. This is why testing (and prewashing) is so important.

3. Always practice good housekeeping.

Good housekeeping is a dyer's term for best practices. Carefully follow all of the safety instructions presented for each dye. Avoid inhalation of dye in powdered form. Keep the tools you use for dyeing separate from those that you prepare food with. Second hand stores and a Dollar Store are the best resource for finding pots, measuring spoons, buckets, grates and other tools to use for your dyeing projects.

Now that you are familiar with the basics, check back later this week for our second installment in this series, which will explain which type of dyes will work best on which fibers. Got any questions? Leave your questions (or your tips!) below. We may share them in an upcoming post!

Friday, March 1, 2013

The Leaning Tower of... Lumiere 3D!

Behold! The Leaning Tower of Lumiere 3D!

Ladies and Gentleman, we present to you the Leaning Tower of Lumiere 3D, an idea born out of one of our weekly meetings, which has taken on a life of its own. The Leaning Tower of Lumiere 3D currently resides near our front entrance, and all who ask about it are invited to make their own additions to the tower as they see fit.

When we launched Lumiere 3D, we were excited to be the first manufacturer to offer a paint that doubles as a powerful glue. The problem was, a lot of folks just didn't "get it." Some people thought it was just our Lumiere paints in a new bottle. Many of those who knew it was an adhesive didn't suppose it was a strong one. Is it a paint? An adhesive? Which section of the craft store can you find it in?

We decided to bolster Lumiere 3D's image with a few changes. First, we added Lumiere 3D in Clear to the product line. This would show that it could be used as a stand alone adhesive, and fulfill the need for a catch-all colorless glue.

Next, we decided to change the Lumiere 3D rack headers in order to get the message across better. Instead of the text only header, we decided to jazz them up as seen below. We used Lumiere 3D to adhere fabric, metal, plastic, leather, and just about any other scraps we could get our hands on. That way, anyone walking by our display could see in a single glance that Lumiere 3D is a paint and a strong adhesive!  


But we didn't stop there! We decided to put the adhesive qualities of Lumiere 3D to the test, and that is where the Leaning Tower of Lumiere 3D came in. The idea is to see how tall of a tower we can build using just popsicle sticks and Lumiere 3D. (some of the wooden popsicle sticks have been colored with Dye-Na-Flow) With 20 foot ceilings in our front office, the sky is the limit! (At least it is where popsicle stick structures are concerned.) What we lack in engineering talents, we make up with our pretty darn strong Lumiere 3D Adhesive!

The most recent iteration of the Leaning Tower of Lumiere 3D is shown at the top of the post. Here are a couple photos of the tower's progression.   


And that, folks, is our Leaning Tower of Lumiere 3D! Currently, it is sitting on a 36" tall table, and stands 38" tall. . Anyone want to guess how tall we can get it?

Tuesday, February 26, 2013

Creating Abstract Lines on Silk

Photo by Marlene Crawford, Technique by Marilyn Zensen

Recently one of our art educators attended a meeting with the Yokayo Guild of Textile Artists in Mendocino County, and came back with a really cool technique for creating abstract lines on silk, as pictured above.  Instead of using an applicator bottle or a paint brush to create outlines, use a small twig! Look for one that is straight and sturdy with a rounded end, where a new cane would start. Dip it in a contrasting color, and trace around your image(s). The result will be a line that ebbs and flows, with a gorgeous abstract effect.


Friday, February 22, 2013

Jacquard Products Colors Second Skin Fish Leather


Today's blog post is a part of John Bead's Blog Hop. The project above was designed and created by our Social Media Coordinator, Charlotte, using Second Skin Fish Leather.

When John Bead invited us to be a part of their blog hop, I jumped at the chance to participate. John Bead's newest product is a leather for jewelry makers, and here at Jacquard, we've got quite a few products that are perfect for coloring leather!

John Bead's newest product is called Second Skin Fish Leather, and it is actual Fish Leather! Tilapia to be exact. While that may not sound appealing, it looks and feels gorgeous, it's finished beautifully,  it's sustainable, and it's very easy to work with.

Out of the 12 available colors, I was assigned the Plum color. I also received a metal cuff, and a pair of Dazzle-it Leather Scissors specially made for cutting leather. Before getting started, I grabbed a handful of Jacquard paints and pigments to experiment with. Here is the final materials list I came up with: 

Supplies:

Second Skin Fish Leather (shown here in Plum)
Piñata Alcohol Ink in Havana Brown 
Lumiere 3D Dimensional Paint and Adhesive in Clear
Jeweler's Wire, 28 gauge 
Round Bead for flower's center
Flower Bead of your choice with open center

Instructions:

Once I had all of my materials together, I decided to cut the leather prior to coloring it. This prevented me from getting any paint, ink, or pigment on my cutting mat, or my cutting utensils.


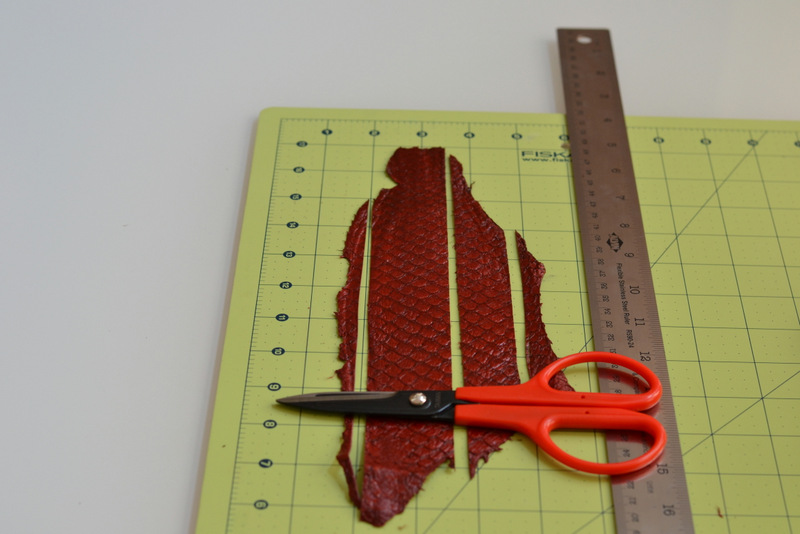
To start, I measured the width of the cuff. This cuff was 1.5" wide. Using a straight edge and a fine tip marker, I marked a straight line on the back of the fish leather as close as possible to one of the long edges so that I could cut off the rough edge on one side. Next I had enough room remaining to mark a 1.5" wide strip, followed by a 1" strip, and then there was just enough scrap leather on the other side to use for experimenting with. The Dazzle It Scissors worked beautifully on leather, I didn't have to squeeze or pinch the scissors, and I didn't have to dull my nice fabric scissors. I ended up with four pieces, as you see below. 

First, I experimented with the width of leather. I decided that I liked a little exposed metal, so I selected the 1" wide piece to use on my cuff. I reserved the 1.5" wide piece for a future project. 


Next, I experimented with color. I took the scrap pieces, and cut them in to smaller pieces to try several different effects with our Piñata Alchohol Inks, our Pearl Ex Powdered Pigments, and our Lumiere Paints. I settled on three finalists, pictured here. 


I decided on the Havana Brown Piñata Ink, which when painted over the plum color of leather, turned in to a rich mahogany brown. The transparency of the Piñata Inks also allowed the natural texture of the leather to show through.  It only took a couple of minutes to dry. Then I took a very light and flexible jeweler's wire (28 gauge) and wrapped it around the painted leather, making sure to keep the wire held flat to the surface of the leather. 


Next, I used Lumiere 3D in clear to apply the leather band to the cuff. The Lumiere 3D takes a little while to dry which afforded me the ability to reposition the leather band until it was centered on the cuff. I was able to wipe away a little bit of excess without any trouble. Once it was in position, I cut off the stray ends of the leather, and allowed it to dry. 

Lastly, I took a head pin and strung it through a round bead, and then through the center of a flower bead. I wrapped the head pin around one of the metal strands surrounding the leather, and then secured with Lumiere 3D Adhesive in Clear. Allow for the adhesive to dry overnight, and your creation will be ready to wear!


Thank you to John Bead for including us in your blog hop!

To find your own Second Skin Fish Leather, contact their product representatives at:  info@metalcomplex.com. 

To find Pinata Alcohol Inks near you, use our store locator.